
Our Blog


Perfection Cleaning BC doesn't just offer great house cleaning Langley. We also offer residential and commercial cleaning services for Surrey, White Rock, Abbotsford, Coquitlam, Port Moody and more! Below we have put together this blog to offer a host of tips and tricks that we have found, researched and even used ourselves in our every day housecleaning. Be sure to bookmark this blog page and check back as we are posting new articles monthly.
BATHROOMS | BC | BEYOND BASIC CLEANING | CARPETS | CLEANING WITH KIDS | DEEP CLEANING | GROUT | HOUSE CLEANERS | HOUSE CLEANING | HOUSE KEEPING | LANGLEY BC | LAUNDRY | MAID SERVICE | OTHER CLEANING | SERVICES | TIPS & TRICKS

0 Clean That Couch - Here's How!
Ok, so you have a gorgeous family couch or sofa. Well, it's usually gorgeous, but over time it is looking a little like something that should be in a junk yard, right!? Well let's see if we can't get it back to it's former glory with these tips for cleaning your couch. 1. Check Manufacturer's Instructions This is important because it can tell you if there are any specific dos & don'ts for washing your couch. There is usually some pretty helpful cleaning instructions available on the label. 2. Check The Label If you can't find the manufacturer's instructions, you can try looking online as well. If not there. Then you can also have a look at the couch's label. The label usually has, albeit more stripped down, instructions for care. 3. What Do These Letters Mean? Sometimes on a label you will see washing instructions and because it's such a small space, they tend to use letter coding. Here's a breakdown of what they mean: W - means that water can be used to clean S - means don't use water - you need to get a solvent-based cleaner WS - means you can safely use water or solvent-based cleaner X - means you can use vaccuum only These are general cleaning tips for couches or sofas. Let us know in the comments if you have any more specific methods you have found effective and for what kind of furniture? * Perfection Cleaning does not guarantee or warranty any suggested cleaning methods or tips. Use at your own risk.

We know how much of a chore it can be to clean out that closet. So we have put together 5 tips to help make that chore a little more manageable. 1. Remove It All Yes, that's right. If you want to be thorough, the best way is to start from a blank canvas. So, take everything out of the close so youc an gain some perspective and see the space you have to work with. Trust us, I know it sounds daunting, but it will save you time and give you the best chance at being happy with the final result. 2. Organize By Colour It's really unbelievable how a simple change of organization can have a huge effect on the overall look of the closet. Organizing your items by colour will help to simplify the space you are looking at. Instead of looking at a mish-mosh collage of clothing, your eyes are now focusing on a clear colour pattern. 3. Get Rid Of What You Don't Wear I know this sounds simple, but even the most organized people have items in their closet they are hanging onto cause they "might wear it when I go out". Well, we're saying, if you haven't worn it in a year, you probably wont, so we say toss it. Of course, if it has sentimental meaning, that's a whole other story. We're mainly talking about that jumpsuit you haven't worn since 1987, probably time to let that one go ;) 4. Box Up Items If you can't rbing yourself to get rid of anything like we suggested in #3, then at least fold it nicely and box it up. This will not only create less clutter, but will also be a good "out of sight, out of mind" test to see if you really need to keep those items in the first place. 5. Flip Through Those Hangers You can continuously keep your closet in check and avoid the big "one over" by simply flipping through your hangers regularily. By doing this you can familiarize yourself with what's in there and of course begin to realize the items you just don't wear, that maybe would serve better being dropped off at the thrift store!! * Perfection Cleaning does not guarantee or warranty any suggested cleaning methods or tips. Use at your own risk.
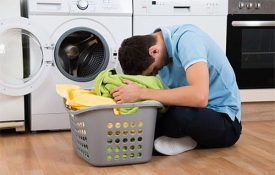
0 The Laundry Monster - Am I Right?
We all know that relentless monster that lurks in our homes feeding on our energy and sometimes even breaking our spirit. I, of course am talking about the Laundry Monster! As those that run the house know, laundry is a daunting, never-ending talk that while is exhausting, needs to be done right. So we bite our tongues and press thru the countless hours of sorting stinky socks, soiled jeans, etc. Well here are three tips to help you be more successful in your laundry battle! 1. Select The Right Water Temperature Water temperature if very important for successful laundry loads. Cold water works well for delicate fabrics or items that might shrink and those articles that have colors sensitive to bleeding. Not to mention, cold water saves us money. But you can also use warm water for soiled clothing. And hot water should be reserved for linens and heavily stained clothing like oil and grease. 2. Select The Right Detergent In regards to detergent, not all detergents are created equal. Powder detergents, for example work well on general loads and are usually cost effective. While liquid detergents do well for pre-treating stains 3. Use Less Detergent Using too much detergent is a common mistake. Using too much detergent can actually have an adverse effect and help to trap soil allowing to go back onto clothing. One thing you could try is using half the recommended amount. Your clothing will come out looking better and save you a load of money! :) Do you have some laundry tips? We would love to hear them in the comments below. * Perfection Cleaning does not guarantee or warranty any suggested cleaning methods or tips. Use at your own risk.

I think you would be hard pressed to find anyone who doesn't want a pool in their back yard. It's such a glamorous status symbol, especially if it's an in-ground pool. And laying their sipping a drink and browsing Instagram in your tablet is quite desirable. But along with having that backyard pool comes much responsibility and work. Not just to keep the pool chemicals up and optimal, but also keeping the pool and surrounding areas nice a clean. So, here we have put together a list of useful pool cleaning tips; 1. Skimming & Scrubbing As an in-ground pool owner myself, this can be the most tedious job. We back on to a mountain and have multiple maple trees and shrubs, so we often have bugs and debris flying into the pool on a regular basis. Skimming the top and scrubbing the pool liner is alot of work, but should be done regularly. 2. Clean The Pool Filter Constantly It is a good habit to get into, to clean the pool filter on a regular basis. Give it (or them) a spray down with a garden hose once in a while to prevent debris build up. 3. Absorb Oils With A Tennis Ball It's a very useful trick that after everyone leaves the pool, throw a tennis ball in. This will allow the tennis ball fibers to absorb and soak up the left over oils from suntan lotion and hair products. 4. Power Wash The Pool Deck Part of what keeps a pool looking awesome, is also keeping that pool deck clean. You can do this by power washing. Be sure to aim the spray away from the water as much as you can to avoid debris falling into the pool. If you have old concrete, you can also get some concrete mix and fill in the cracks and holes. Then, once dry paint the pool deck with a gritty "Deck Over" type paint to bring some luster and consistency to the look of that pool deck. 5. Watch That Water Level The water should come about half way up the skimmer opening. Keeping proper pool water level can aid in proper distribution of chemicals and water flow and thus warding off algae and other films. Have some other tips for keeping your pool clean? Please leave them in the comments below! Happy Swimming!! * Perfection Cleaning does not guarantee or warranty any suggested cleaning methods or tips. Use at your own risk.

0 Hidden Germs & Where To Find Them
We all know keeping a clean home is important. But what if you don't know exactly where to clean? What if there are things that need to be, or should be cleaned that you didn't even think of? In this post we are going to outline some of the areas and items in your home that you may not have thought of cleaning, but definitely have germs that need eradicating!! TOOTHBRUSH Yes, this little item that we use to clean our teeth everyday, can be a nice hideout for germs. Especially if it sits close to the toilet. Make sure you rinse it thoroughly before and after brushing to wash off any germs that may have floated and landed on it inbetween brushings. TOWELS It's common practice to have a face towel in the bathroom next to the sink to dry off after washing your hands or face. But think about how much bacteria gets on the towel over time. Patting your face with this bacteria riddled towel is a quick recipe for sickness. MOBILE PHONES Yes, those little devices that have integrated into our life, are also magnets of tonnes of germs and bacteria. According to studies, it's possible that your phone has 10 times more bacteria than a toilet seat. MAKEUP BRUSHES Even seemingly harmless makeup brushes can be attractors of germs and bacteria. With left over makeup, dead skin and dirt, your makeup brush could be the culprit if you get sick often. These are just a few areas you may not have thought about in your cleaning routines. Be sure to clean these thoroughly, or, where possible, remove them entirely. It's these little extra steps that make your home that much cleaner! * Perfection Cleaning does not guarantee or warranty any suggested cleaning methods or tips. Use at your own risk.
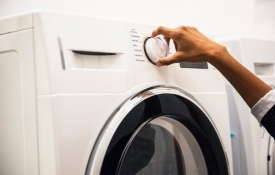
0 4 things I learned while doing laundry at friends’ homes
We stumbled across this interesting little article by Jura Koncius (Home and design writer), that is quite informative about the different types of washing machines, dryer sheets, their benefits and more! Enjoy! ------------------------------------------------------------ Most of us do our laundry the same way every time. When I was recently without a washing machine for two weeks, two friends were nice enough to have me over and make me dinner while I schlepped bags of dirty towels and pajamas into their basements. Their newer washers and dryers and their own styles of doing laundry made me reexamine our family laundry drill. In 2003, we bought one of the first front-loading high-efficiency washers introduced to Americans. The Whirlpool machine served us well and probably only generated one repair visit in its long life. Last month, the washer started to make a horrible grinding noise, and I knew it wasn’t worth costly repairs at its advanced age. It also smelled bad. I bought a washing machine the next night without too much fuss: a Maytag Maxima HE front-loader that seemed to have the features and the price tag I wanted. Our 16-year-old Whirlpool dryer was still going strong, so I chose not to replace it. (I don’t need a fancy matched set, as my laundry area is in an unfinished basement and will never be Instagram material.) Using my friends’ machines and detergents while I waited for my new machine to be delivered was enlightening. I learned that a top-loading, high-efficiency washer can be pretty deep; you might not be able to reach the clothes at the bottom unless you have a tall roommate. I also found myself missing the pedestals I bought for my front-loaders; they raise the height up about a foot and provide a storage drawer. It’s always interesting to see how others handle basic chores; sometimes you get a glimpse of this as a houseguest. Here are four things that shook up my laundry game after seeing my friends’ setups. You might be inspired, too. Saying goodbye to dryer sheets My mom embraced dryer sheets in the 1970s, when they proved an easier way to soften and prevent wrinkles than adding liquid fabric softeners. So, I naturally tossed a dryer sheet into every load, except for towels, without giving it much thought. My friend Susan never uses dryer sheets or fabric softener, and she says she doesn’t miss it (although she does sometimes get the dreaded static cling). My friend Nancy uses dryer balls as a greener (and less expensive) choice, and I liked how fluffy they made my cotton loads. I’m planning to order some dryer balls and will limit my use of dryer sheets in the future. Keeping the washer door ajar is (still) a must Mold is a dirty word to owners of front-loading high-efficiency washers. Manufacturers have struggled to figure out how to prevent these low-water machines from developing a musty, mildewy smell that can come from detergent residue or clothing fibers getting stuck inside its parts. My old machine had a bad odor, and by the time I started leaving the door ajar, it was too late to totally get rid of it. I figured someone must have come up with a solution to that since 2003, but my friend Susan’s five-year-old Kenmore front-loader had a slightly musty smell, too. The salesman who recommended my Maytag told me it’s still best to keep the door open when not in use and run the washer’s cleaning cycle once a month. Experiencing even whiter whites The load of whites I did in Nancy’s Samsung high-efficiency top-loader were so bright, clean and fresh that they glowed when I took them out. I used her Mrs. Meyer’s Clean Day Laundry Detergent in lemon verbena and OxiClean White Revive brightener. Why was there such a difference? As the years go by, your washer probably will experience a marginal decrease in performance, and your clothes can start to look dingy, according to Melissa Maker, who started a cleaning service in Toronto in 2006 and has been writing for the blog Clean My Space since 2011. “It’s not something that you’d really notice, it happens gradually,” Maker says. “When you washed your clothes in a newer machine with different products, it made you think, ‘What have I been missing all these years?’ ” Maker says adding a brightener to your detergent really makes a difference. I’m going to try that combo in my new washer. Finally keep up with cleaning the dryer vent I periodically clean out the opening under the lint filter using a flexible dryer lint brush, a product Maker highly recommends and calls “a long mascara wand.” But I had never thoroughly checked out my dryer vent or had it professionally cleaned (even though I have written about the fire hazards of lint-clogged vents). Susan cleaned her vent about a year ago when her loads started taking much longer to dry because of decreased air flow; Maker says that’s the telltale sign you need to clean your duct, fast. Nancy does it once a year or so with a vacuum. These conversations persuaded me to get a $59 Groupon for a dryer vent cleaning. The pros told me my vent was only lightly coated with lint; they said that was probably because we remove the lint from the filter tray after every load. Maker says if you’re a handy person, you can clean it yourself, but if not, go with a pro. * Perfection Cleaning does not guarantee or warranty any suggested cleaning methods or tips. Use at your own risk.
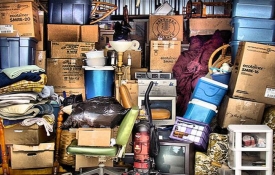
Cleaning out the garage is considered to be a daunting task by almost everyone. We have put together some tips here to help you to create some order out of the chaos and have a successful garage cleaning experience. The best way to tackle cleaning a garage is to start from the top and work your way down. A messy garage will most likely start with the mess on the floor and slowly, voer time build up, higher, up the walls, etc. So, starting at the top and working down will allow you to start to get some quick satisfaction by seeing some quick clean, and thus staying motivaqted and not getting discouraged. Start by taking a broom and brushing away all the cobwebs, dust on light fixtures and the garage door opener. Take a cloth and cleaner of your choice and wipe down the walls where necessary, and give any windows and other fixtures a wipe down. Next, we can start to tackle the floor. Take any big objects and put them out the garage door. Get them out of the way for now. Then, starting at the back of the garagem use a push broom to start sweeping all dirt and debris towards the wide open garage door. Once it's all at the end, grab a dust pan and dispose of the pile(s) of dirt in a garbage can. Depending on what kind of flooring you have, you may also want to grab the mop and some cleaner and do a quick floor scrubbing. And maybe even a polishing if the type of floor requires. If you you have a plain cement garage floor, you may consider painting the floor. It helps to give the room a much cleaner feel, while also making it easier to clean in the future. Remember to use a high quality floor paint, as that will extend the life of the garage floor and will also fill in any cracks and crevases. Now, back to the task at hand. If you don't have any shelving in your garage, you may want to consider doing that now. If you ahve the room, you can put shelves on the walls, and if you have the height you can even put shelves hanging from the roof. We have even seen some really elaborate setups where the ceiling shelf is a lowerable platform via a small motor. Once you have created your shelving, you can begin to put the larger items and boxes that once cluttered your garage floor, neatly away on them. But give it some thought. Put items that get used the least further back or higher up on your shelves. And the more frequently used items closer and lower. You'll be gald you did!!! Do you have any tips to share for cleaning your garage? Submit them in the comments below. * Perfection Cleaning does not guarantee or warranty any suggested cleaning methods. Use at your own risk.
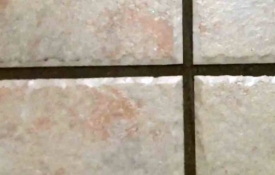
0 Grout! What is it? How Do You Clean It?
What Is Grout? Well, let's start off by figuring out what the heck grout is? Wikipedia defines "grout" as; "Grout is a dense fluid which is used to fill gaps or used as reinforcement in existing structures.[1] Grout is generally a mixture of water, cement, and sand and is employed in pressure grouting, embedding rebar in masonry walls, connecting sections of pre-cast concrete, filling voids, and sealing joints such as those between tiles. Common uses for grout in the household include filling in tiles of shower floors and kitchen tiles. It is often color tinted when it has to be kept visible and sometimes includes fine gravel when being used to fill large spaces (such as the cores of concrete blocks). Unlike other structural pastes such as plaster or joint compound, correctly mixed and applied grout forms a waterproof seal." Well, that's the technical term for it. Here at Perfection Cleaning we like to define grout as those nasty little crevasses between your tiles in the bathroom or kitchen that like to collect dirt, grime, dust and germs. How Do you Clean It? Everyone has their methods of cleaning those sometime hard to clean grout areas, but we recently found a cute little video on YouTube that highlights "3 Ways to Clean Grout!" as posted by "Clean My Space". So watch the video and hopefully this helps you with your grout cleaning woes. Of course you can alwasy contact Perfection Cleaning to come on in and clean that grout for you ;) Do you have another method of cleaning grout? Feel free to comment and share your techniques! * Perfection Cleaning does not guarantee or warranty any suggested cleaning methods. Use at your own risk.

0 5 Things You Might Not Be Cleaning, But Should!
Everyone knows we have to clean the dishes, we have to clean the toilet, we have to vacuum, etc, etc, etc, but here's a list of things that may not have crossed your mind. Now if you clean a bunch of the things on this list, awesome! Give yourself a pat on the back for taking your home cleaning to the next level. But for many, this is a list of things they may never have thought of cleaning. Or did, but it was so daunting, they just couldn't bring themselves to do it. So, let's dive in, shall we..... 1. Hairbrushes That hairbrush of yours can get pretty funky with all the moisture, product and let's face it, germs, that infest it on a regular basis. Drop that bad boy into some warm water and shampoo and let it soak for a bit. Then, you may have to take some scissors and cut away the coiled up hair, to get that brush back to a clean, healthy state. 2. Toothbrushes You would think that since a toothbrush is a cleaning tool, with a cleaning (sometimes whitening) agent on it, and we rinse it during the procedure of brushing our teeth, that it would be constantly cleaned. Think again. Those badboys can get germs and plaque inside those bristles and they can be stubborn to remove. Try soaking those smelly toothbrushes in vinegar to give them that extra clean. 3. Toothbrush Holder On the topic of toothbrushes, how about that toothbrush holder. Does yours look all encrusted like something that sank with the Titanic? Take a bush (not your toothbrush) and some cleaner to it and polish it back up to it's former lustre. 4. Vacuum Filter That vacuum does alot of work for us, doesn't it? And as you can imagine, the filter get absolutely filthy! Now, we have read that you can put those filters in the dishwasher, but we're not really sure how good of an idea that is? Depending on the dishwasher and amount of soiling on the filter, you could end up really clogging up something. Maybe it may be safer to just sit the filter in the sink and use the power head on your tap to spray it clean? Get those allergens and germs cleaned right out of there. 5. Remote Control That tv remote with all the fingers and thumbs mashing down the buttons, foods and liquids getting spilled on it. It's been through a lot and it shows. Give that badboy the cleaning it deserves. Remove the batteries first, and then using a microfiber cloth, or old, clean toothbrush, and a bit of water to dampen the cloth or brush, start to scrub away the grime and germs. Don't spray anything onto the remote. You may just end up wrecking the circuitry. So, there you have it. 5 things that you may not have thought about or have dreaded cleaning, that you really should! We know there are many more things out there, but we will save those for another post. What other items do you clean that you think many people don't think of? Let us know in the comments below. * Perfection Cleaning does not guarantee or warranty any suggested cleaning methods. Use at your own risk.

0 Disinfection | Not just in the home!
Imagine a petri-dish filled with bacteria, then add a recline function and limited legroom. Now you’re accurately imagining the typical airline seat. According to study after study, airplanes are filthy places and the average tray table, for instance, is exponentially more disgusting than a home toilet seat. Other top spots for airplane germs include seat-belt buckles, seat-back pockets, and the tops of seats (especially aisle seats, since countless people touch them for balance as they walk by in flight each day). But take heart, germaphobes—and anyone else who doesn’t want to spend their whole vacation hacking up a lung. There are small steps you can take that will make your assigned petri dish a little less squirmy. Here’s how to disinfect your airplane seat and boost your chances of an illness-free vacation. A Step-by-Step Guide to Disinfecting Your Airplane Seat With minimal supplies and just a moderate tolerance for weird looks from your fellow passengers, you too can have the cleanest seat on the plane. Here’s how to get there. Pack Disinfecting Wipes You’re going to need to plan here a bit and score some disinfecting wipes before you get on the plane. You can opt for a familiar brand name like Clorox Disinfecting Wipes, which come in handy packs of nine or 15. Note that these have a pretty intense scent (the lemon is not what I’d call “good lemon,” and whatever the green package scent is smells a bit like a freshly cleaned public bathroom). You can also get medical-grade disinfecting wipes with a milder scent, or, in a pinch, you could use wipes primarily meant to disinfect hands rather than surfaces, such as Purell Individual Sanitizing Hand Wipes (which also come in travel packs). Get Your Wipes Out as Soon as You Board. Packing wipes is only half the battle. Once you’ve boarded, you’ll need to overcome your aversion to creating a minor spectacle as you stow your gear, whip out your wipes, and get disinfecting. If it helps, you can pretend that those are stares of envy at your traveling prowess rather than garden-variety side eye. There’s a right way to use disinfecting wipes, and many wrong ways. To do it correctly: Wipe down all hard, nonporous surfaces thoroughly. Make sure you read and follow the package instructions about how long the surface needs to stay visibly wet. This ranges from about 30 seconds to four minutes. This is when the germ-killing magic happens, so you can’t rush it. Note that this means you’re going to be provisional for a bit longer before you settle and make yourself comfortable. Kidding: Everyone knows you’re not going to be comfortable on the plane. But at least you can maybe emerge illness-free. But What About Upholstered Surfaces Don’t use disinfecting wipes on upholstered surfaces: It won’t work and it will make the fabric wet, which creates a whole separate problem. If you’re concerned about exposure to germs on fabric seats, you can pack a disposable airplane seat cover; or, if you want to minimize waste, get washable and reusable seat and tray table covers. There are also smaller disposable covers that cover just the airplane tray or the headrest. Bonus PSA About Seatback Pockets No pocket needs a protector like the airplane seatback pocket, home to one of the airplane’s highest concentrations of germs. If you’re one of those travelers who uses this pocket to stash your water bottle or extra snacks in the seatback pocket, just please don’t ever again. Until some genius (you perhaps?) invents a disposable liner for the seatback pocket, opt for a seatback-pocket replacement accessory like the Flight 001 Seat Pak (I’ve had mine for nearly 10 years and swear by it) or Genius Pack’s High Altitude Flight Bag, which both hang from the seatback tray toggle. * Perfection Cleaning does not guarantee or warranty any suggested cleaning methods. Use at your own risk.
 CALL TODAY FOR A FREE ESTIMATE! FRASER VALLEY/SURREY OFFICE: (604) 625-0050 -or- COQUITLAM/TRI-CITIES OFFICE: (778) 945-8600
FRASER VALLEY/SURREY
(604) 625-0050
perfectioncleaningbc@yahoo.ca
COQUITLAM/TRI-CITIES
(778) 945-8600
perfectioncleaningvan@yahoo.com
All material contained within this website ©2008- Perfection Cleaning BC.